

How to Make Bulk Rock Candy? It’s a question every busy restaurant owner may ask when looking to bring a unique touch to their venue. Here’s a quick overview:
- Boil 2 cups of water.
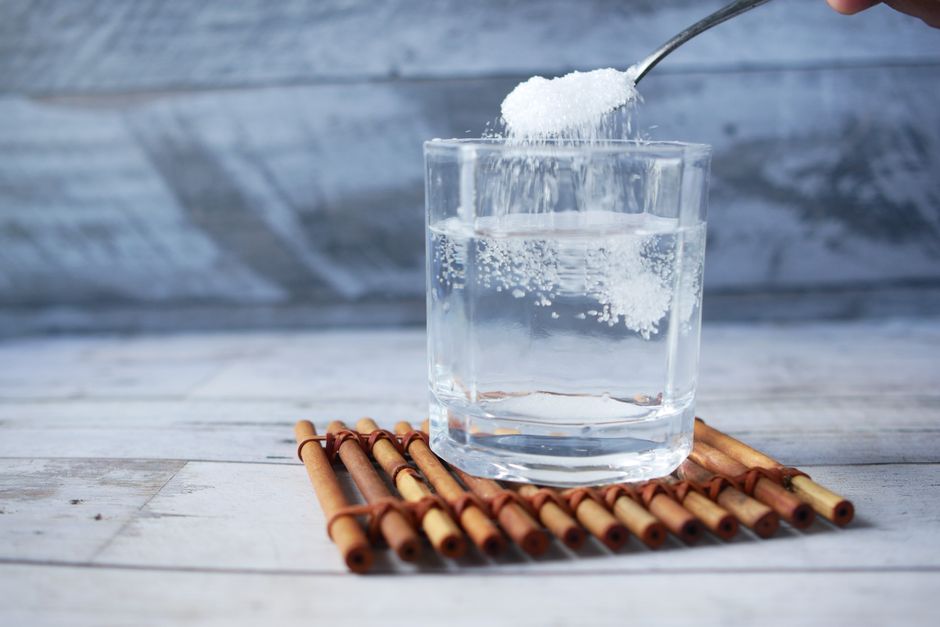
- Add 4 cups of sugar, half a cup at a time.
- Cool the solution for 15-20 minutes.
- Pour into clean glass jars.
- Insert prepped sticks or strings.
- Wait up to two weeks for crystal growth.
Making bulk rock candy involves creating a supersaturated sugar solution, allowing the sugar to crystallize over time. This science experiment is not only fun but also visually fascinating.
I'm Sarib Rehman, and I've spent years simplifying complex processes for busy professionals. In this guide, you'll find everything you need to know about making bulk rock candy efficiently.

Ingredients and Equipment Needed
Making bulk rock candy requires just a few simple ingredients and some basic equipment you likely already have at home. Here's what you'll need:
Essential Ingredients
To create your rock candy, you'll need:
Granulated Sugar: This is the main ingredient. For five sticks of candy, you'll need about 10 cups of sugar.
Water: Essential for dissolving the sugar. You'll need 4 cups to start.
Food Coloring: Optional, but it can make your rock candy look more appealing. Gel food coloring is more concentrated, so you'll need less of it compared to liquid food coloring.
Flavoring Extracts: These are optional but can add a fun twist to your candy. Popular choices include raspberry, cinnamon, peppermint, banana, and maple extracts.
Necessary Equipment
Here’s the equipment you'll need to make bulk rock candy:
Wooden Skewers: These will serve as the base for your rock candy. You can also use rock candy sticks for a more professional look.
Mason Jars: Standard 16 oz. mason jars work well to hold the sugar solution. You'll need one jar per stick of candy.
Clothespins or Chip Clips: These are used to balance the skewers so that they don't touch the bottom of the jars.
Saucepan: A large saucepan is necessary for boiling the water and dissolving the sugar.
Candy Thermometer: Optional but helpful. The ideal temperature for your sugar solution is around 265-270°F.

Step-by-Step Setup
- Prepare the Skewers: Submerge them in water, coat them in granulated sugar, and let them dry for at least an hour.
- Set Up the Jars: Make sure they are clean and warm. Balance the skewers using clothespins or chip clips so they hang about an inch from the bottom of the jars.
- Make the Sugar Solution: Boil 4 cups of water and gradually add 10 cups of sugar, one cup at a time, stirring until fully dissolved.
- Cool and Color: Let the solution cool for about 15 minutes before pouring it into the jars. Add food coloring and flavoring extracts at this stage.
Once everything is set up, you'll just need to wait for the crystals to grow, which usually takes about 6-7 days.
In the next section, we'll dive into the step-by-step process of preparing the sugar syrup and setting up your jars and skewers.
Step-by-Step Guide to Making Bulk Rock Candy
Preparing the Sugar Syrup
To start making bulk rock candy, you need to prepare a sugar syrup. This syrup will form the base for your rock candy crystals.
- Boiling Water: Begin by adding 4 cups of water to a large saucepan. Bring the water to a boil over medium heat.
- Dissolving Sugar: Gradually add 10 cups of granulated sugar, one cup at a time. Stir continuously with a wooden spoon, making sure each cup fully dissolves before adding the next. The mixture will become thick and syrupy.
- Supersaturation: You'll notice the sugar starts to clump before dissolving. This indicates your solution is becoming supersaturated, which is perfect for crystal growth.
- Cool and Color: After all the sugar has dissolved, let the solution simmer for about 5 minutes. Remove from heat and allow it to cool for 15 minutes. At this stage, you can add food coloring and flavor extracts to customize your rock candy.
Setting Up the Jars and Skewers
While your sugar syrup cools, prepare your jars and skewers.
- Clean Jars: Ensure your jars are clean and warm. Running hot water through them beforehand helps.
- Sugaring Skewers: Trim your wooden skewers if needed, then dip them in water and roll them in granulated sugar. This "seeds" the skewers, giving crystals something to latch onto. Let them dry for at least an hour.
- Suspending Skewers: Attach a clothespin or chip clip to each skewer. Balance the skewers over the jars so they hang about an inch from the bottom. This prevents the crystals from sticking to the jar's bottom.
Growing the Crystals
Now it's time to combine everything and let the magic happen.
- Filling Jars: Carefully pour the cooled sugar syrup into the prepared jars. Fill them close to the top but leave some space to avoid overflow.
- Inserting Skewers: Gently place the sugared skewers into the jars, ensuring they are suspended and not touching the bottom.
- Waiting Period: Move the jars to a safe, undisturbed location. Avoid moving them around once the skewers are in place. Crystals will start forming within a day, but for best results, let them grow for at least 6-7 days.
During this waiting period, you'll see the sugar crystals start to form and grow on the skewers, creating beautiful, large rock candy sticks.
Next, we’ll cover some tips and tricks to ensure successful crystal growth and explore creative flavor and color combinations to make your rock candy truly unique.
Tips for Perfect Rock Candy
Ensuring Successful Crystal Growth
Crystal Formation: To get large, beautiful crystals, start with a supersaturated sugar solution. This means dissolving as much sugar as possible in boiling water. As the solution cools, sugar will start to crystallize on the skewers.
Heat Management: Use a candy thermometer to ensure your solution reaches the right temperature. Aim for around 230°F (110°C). If it's too hot, the solution will crystallize too quickly. Too cool, and it will take forever to form crystals.
Avoiding Contamination: Make sure your jars and skewers are completely clean. Contaminants can interfere with crystal growth. Wash everything with hot water to ensure cleanliness.
Optimal Conditions: Place your jars in a stable, undisturbed location. Any movement can disrupt the crystal formation. Also, keep the jars away from direct sunlight to avoid temperature fluctuations.
Troubleshooting
Problem: Crystals not forming on the skewers. - Solution: Ensure your skewers are properly seeded with sugar. Roll them in sugar after dipping in the solution.
Problem: Crystals forming at the bottom of the jar. - Solution: Make sure your skewers are not touching the bottom. Use clothespins to suspend them properly.
Problem: Syrup solidifies too quickly. - Solution: You may have overheated the solution. Aim for the correct temperature range and monitor closely with a thermometer.
Creative Flavor and Color Combinations
Adding flavors and colors can make your rock candy more exciting. Here are some ideas:
Flavors: - Raspberry Extract: Adds a fruity, tangy flavor. - Cinnamon Oil: Perfect for a warm, spicy kick. - Peppermint Extract: Refreshing and cool. - Banana Oil: Unique and tropical. - Maple Extract: Sweet and rich, perfect for fall.
Colors: Use gel food coloring for vibrant hues without adding too much liquid. The color will look lighter once the crystals form, so make the solution a bit darker than desired.
Experiment with different combinations to create your own unique rock candy!
Frequently Asked Questions about How to Make Bulk Rock Candy
How do you make rock candy in 1 hour?
Making rock candy in just one hour is challenging but possible with a quick method.
Here's how:
- Prepare Hot Sugar Liquid:
- Boil water and dissolve as much sugar as possible until the solution is supersaturated.
-
Use a candy thermometer to ensure the solution reaches the syrup stage (230°F/110°C).
-
Safety Precautions:
- Handle hot sugar liquid with care.
-
Ensure adult supervision if kids are involved.
-
Rapid Cooling:
- Pour the hot solution into heat-resistant jars.
-
Insert pre-sugared skewers or strings immediately.
-
Crystal Growth:
- Let the jars cool rapidly but avoid moving them too much.
- Crystals should start forming quickly.
This method speeds up the process significantly, but the crystals might be smaller compared to the traditional week-long method.
How to make large crystal rock candy?
To make large crystal rock candy, slow and steady wins the race. Here are some tips:
- Use Aluminum Foil:
- Wrap the jars in aluminum foil to slow down the cooling process.
-
This helps larger crystals form over time.
-
Thermos Method:
- Use a thermos to keep the solution warm longer.
-
This controlled cooling environment promotes larger crystal growth.
-
Lollipop Sticks:
- Use lollipop sticks instead of skewers for a sturdier base.
- Make sure the sticks are well-coated with sugar before inserting them into the solution.
How long does it take to grow rock candy?
The traditional method for growing rock candy takes about 6-7 days. Here's why:
- Growth Period:
-
The solution needs time to cool and for sugar crystals to attach to the skewers or strings.
-
Evaporation:
-
As water evaporates, the solution becomes even more saturated, promoting crystal growth.
-
Crystal Formation:
- Check the jars daily to monitor progress.
- If the crystals stop growing, reheat the solution, add more sugar, and start again.
Growing rock candy is a lesson in patience, but the results are worth the wait!
Conclusion
At Flipcost, we understand the joy and satisfaction that comes from making your own rock candy, especially in bulk. Crafting rock candy is not just a fun project; it’s also an educational experience that teaches patience and the science behind crystal formation.
When you’re ready to make bulk rock candy, Flipcost offers everything you need. Our high-quality products ensure that your rock candy turns out perfectly every time. From granulated sugar to food coloring and flavor extracts, we have you covered.
Why Choose Flipcost?
High-Quality Products: Our ingredients are top-notch, giving you the best results for your homemade rock candy.
Diverse Range: Whether you want classic flavors like raspberry and peppermint or something more unique like banana or maple, we offer a wide variety of flavor extracts and food colorings.
Expert Guidance: We provide detailed guides and tips to help you achieve the best crystal growth and flavor combinations.
Customer Satisfaction: Our customers love the results they get with our products. One happy customer shared, "We’ve never had very good luck attempting to make rock candy, but we FINALLY got it right with this recipe! My kids were so excited that they made their own candy!"
Ready to start your rock candy journey? Visit our candy collection for everything you need to make high-quality, delicious rock candy in bulk.
With Flipcost, making bulk rock candy is not only possible but also enjoyable. Happy candy crafting!